

·
Mar 7, 2025
How to Create Visual Aesthetic of DIY Resin Art to Transform Your Favorite Spaces
Creating stunning epoxy resin art is increasingly popular nowadays, especially among DIY enthusiasts. Epoxy resin offers a flexible and versatile medium for making everything ranging from stunning epoxy resin tables to decorative artworks that will grab your attention with their crystal-clear finish. In this guide, we'll discuss the basics of working with clear epoxy resin and explore a few creative projects you can try yourself at home.
What is Epoxy Resin?
Epoxy resin is a two-part system which requires resin and hardener. They should be mixed together to create a durable, clear, and glossy finish. The epoxy comes in the form of a liquid and will transform into a solid through a chemical reaction after a while. This transformation makes it perfect for various applications such as coating surfaces, creating decorative items, and preserving objects inside of a crystal-clear appearance. Pick the one formulated with resistance to yellowing and bubble-free which is ideal for creating beautiful epoxy resin art that lasts.
Essential Materials for Working with Epoxy Resin
Before starting any epoxy resin projects, you need the following essential materials:
- clear deep pour epoxy resin and hardener
- Measuring containers
- Mixing sticks
- Nitrile gloves
- Safety glasses
- Heat gun (for removing bubbles)
- Molds (for making art pieces or smaller items)
- Wooden surface (for making an epoxy resin table)
- Optional: colors, pigments, or decorative objects to embed
Epoxy Resin Table Creation Guide

Creating an epoxy resin tabletop is one of the most rewarding projects you can tackle, especially if you get the raw tabletop for cheap. You can also buy a tabletop with a damaged surface as long as it has the look you are looking for. You will be fixing the surface anyway with the resin, so it should not be an issue. The finished product combining the natural beauty of wood with the glass-like finish of clear epoxy resin will create beautiful furniture for your needs.
Step 1: Prepare Your Workspace
Find a clean, dust-free area with good ventilation as it will affect the finished result. Cover your work surface with plastic sheeting to protect it from spills. Plastic sheeting can also be used for multiple times, which is a good investment for your next project.
Step 2: Prepare Your Wood
For an epoxy resin table, prepare your wooden tabletop:
- Sand the wood surface to remove rough spots
- Clean away all dust, preferably with vacuuming machine
- Seal the edges with tape if necessary
- Apply a thin sealer coat if the wood is very porous considering air can enter through the pores which create bubbles.
Step 3: Mix the Epoxy Resin
Follow the manufacturer's instructions carefully:
- Measure parts of resin and hardener based on the amount suggested by the manufacturer. It is also recommended to know the ideal curing temperature which is usually around 75-100°F
- Mix slowly for 3-5 minutes to avoid any excessive air bubbles
- Don't forget to scrape the sides and bottom of the container while mixing as they tend to stick.
Step 4: Pour the First Layer
It is recommended to start with a thin layer of epoxy on your wood.
- Pour slowly in the center because resin has self-leveling property, and let it spread naturally
- Use a spreader to spread it when necessary
- Remove bubbles with a heat gun or torch, and make sure to move around the torch to prevent creating a hot spot
- Let this layer partially cure which normally takes around 2-4 hours but check the manufacturer's instructions for more accurate time.

Step 5: Add Decorative Elements
Once the first layer is half cured, you can add decorative elements:
- For the dark flower tabletop, you can add dried flowers or plastic flowers, dark green leaves for accentuating the look, red petals for further enhancing the beauty of the table.
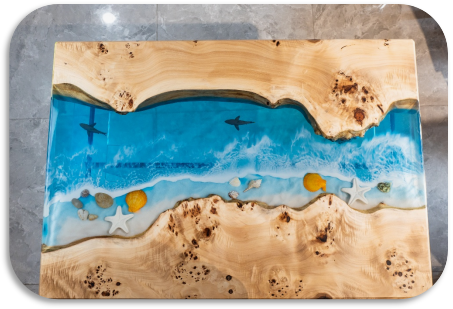
- For the nautical tabletop, you can add sea creatures such as fish, sea turtles, starfish, shells, or anything that you like. However, make sure you include different dyes to display the ocean waves and foams.

- Place them carefully with a toothpick or small tool of your choice.
- Make sure they stay where you want them to be, and you can even dunk them slightly to the first-layer resin to stick to their positions.
Step 6: Pour the Final Layer
- Mix another batch of epoxy resin for the next layer, and you can combine it with different colors if you want.
- Pour carefully over your first layer and decorations, and make sure their positions don't change drastically.
- Make sure to cover everything evenly for a better look.
- Use your heat gun to remove any bubbles.
- Let it cure completely according to the product instructions which may take around 24-72 hours.
Step 7: Finish Your Table
After the resin has fully cured, there are several things you can do:
- Sand the edges if necessary to make them smooth and nice-looking.
- Polish the surface to get a more refined look with fine-grit sandpaper if needed
- If you want to use it as a dining table, ensure it is properly cured before use.
Epoxy Resin Art Projects
There are so many resin projects beyond tables that you can make. Clear epoxy resin is perfect for creating such stunning art pieces, and here are some popular epoxy resin art projects that you may want to consider for future projects:
Resin Coasters

Coaster is a super friendly project for beginners because it is a low-cost product with very simple steps to do. However, you still need to find silicone molds in the shapes you want before starting the project. You can also add small items (preferably pressed) such as flowers or seashells depending on your preference.
River-Style Chair Seat

Create stunning chair seats with the popular "river" technique. This technique is basically pouring the resin in the gaps between slabs of wood. To create this, you need to tint your resin blue or green depending on your preference and pour it in between the wood slabs.
Resin Jewelry

Epoxy resin also can make beautiful, unique, and personalized jewelry. It is recommended if you are getting more confident with your skills. If you want to do that, you need more specialized molds. They usually have a higher price tag, especially those with more intricate details. It is also recommended to know how to blend color pigments to create a more dynamic look to your jewelry.
Conclusion
Epoxy resin offers endless possibility, and it is only limited by your imaginations and your current confidence in executing the projects. No matter what you make, whether epoxy resin table for dining room, or just small decorative items, the glass-like finish of the resin can create amazing results. With proper preparation and technique execution, even beginners can create nice-looking resin arts.
For high-quality epoxy resin and supplies, you can check the resin from Bond Craftor to explore their range of products designed specifically for high quality epoxy resin projects for enthusiasts and professionals.