

Short answer: yes. But most "UV resin kits" online are just a bottle of resin. No curing light, no molds, no jewelry findings. You order it, it arrives, and then you realize you’ll need to spend an extra $40 just to make a single earring.
Still, as a beginner, you might wonder what materials you actually need, This guide is all about complete, ready-to-use kits — UV light included, jewelry hardware included, decoration materials included.

How UV Resin Works for Jewelry
You’ve probably seen all kinds of stunning resin jewelry on TikTok and Pinterest, and you’re eager to try making some yourself. But as soon as you start searching online, your excitement fizzles out — pages are filled with confusing talk about mixing ratios, hardeners, curing times, and toxic fumes. It’s enough to make any beginner close the tab.
Relax. UV resin is a whole different world. Unlike traditional two-part epoxy, UV resin doesn’t require complicated mixing, doesn’t take 24 hours to cure, and produces almost no strong or harmful fumes.For beginners, understanding UV resin doesn’t need to be complicated. Here are the three core facts you need to know:
1. Single-component, ready to use
UV resin comes in a single bottle. Just twist off the cap and start using it. No mixing ratios, no measuring hardeners — unlike two-part epoxy, this makes it incredibly beginner-friendly and hassle-free.
2. Cures with UV light, not air
After application, the resin stays liquid until exposed to a UV light. Shine a UV lamp for 2–3 minutes, and it hardens into a durable, solid piece. Without UV exposure, the resin remains liquid, giving you complete control over working time and positioning.
3. Transparent and hard when cured — perfect for wearable jewelry
Once cured, the resin is clear, firm, and maintains its shape — earrings won’t droop, pendants won’t sag. Most beginner kits feature non-yellowing formulas, so your creations stay beautiful even after prolonged wear.
The resin itself is simple. What trips up most beginners is buying the resin but not having the right tools and hardware to actually finish a piece. That’s why a complete UV resin kit — with curing light, molds, and jewelry findings — makes all the difference.
What a Complete UV Resin Jewelry Kit Actually Needs to Include
If you’re new to UV resin jewelry, it’s tempting to grab any bottle of resin and call it a day. But here’s the reality: most beginner kits only include the resin itself — maybe a mold or two. Without the right combination of tools, lights, and materials, your first project can quickly become frustrating. A truly complete UV resin kit should cover six essential layers:
-
Layer 1: Curing System
- ✅ UV resin liquid
- ✅ UV curing light — this is the most commonly missed item
Without a UV lamp, curing under sunlight can be inconsistent, and indoor curing may not work properly at all.
-
Layer 2: Working Tools
- ✅ Disposable mixing cups — resin is difficult to clean, so ordinary cups are not recommended
- ✅ Stir sticks — wooden sticks help reduce static and bubbles
- ✅ Tweezers — for precise placement of dried flowers, glitter, or small decorations
- ✅ Silicone mat — protects your work surface and prevents cured resin from sticking
-
Layer 3: Molds
- ✅ Silicone jewelry molds for earrings, pendants, charms, or keychains
- ⚠️ Choose shallow or transparent molds so UV light can penetrate and cure the resin fully
-
Layer 4: Jewelry Hardware
- ✅ Earring hooks
- ✅ Earring studs
- ✅ Bezel pendants
- ✅ Necklace cords
- ✅ Key rings
- ✅ Split rings
Without jewelry hardware, your resin pieces may look beautiful, but they won’t be wearable or functional.
-
Layer 5: Embellishments
- ✅ Glitter
- ✅ Dried flowers
- ✅ Foil paper
These small decorative materials are what make each piece feel unique, personal, and giftable.
-
Layer 6: Safety Materials
- ✅ Gloves and finger cots
- ✅ Resin tape to protect surfaces, edges, or open-back bezels
Most kits on the market cover only Layer 1, and some may include part of Layer 2. Very few cover all six layers. That’s what sets a complete kit apart. The Bond Craftor UV Resin Kit, for example, covers all six layers and gives beginners the essential materials they need to start making wearable, polished jewelry right out of the box — without last-minute trips to buy missing tools or hardware.

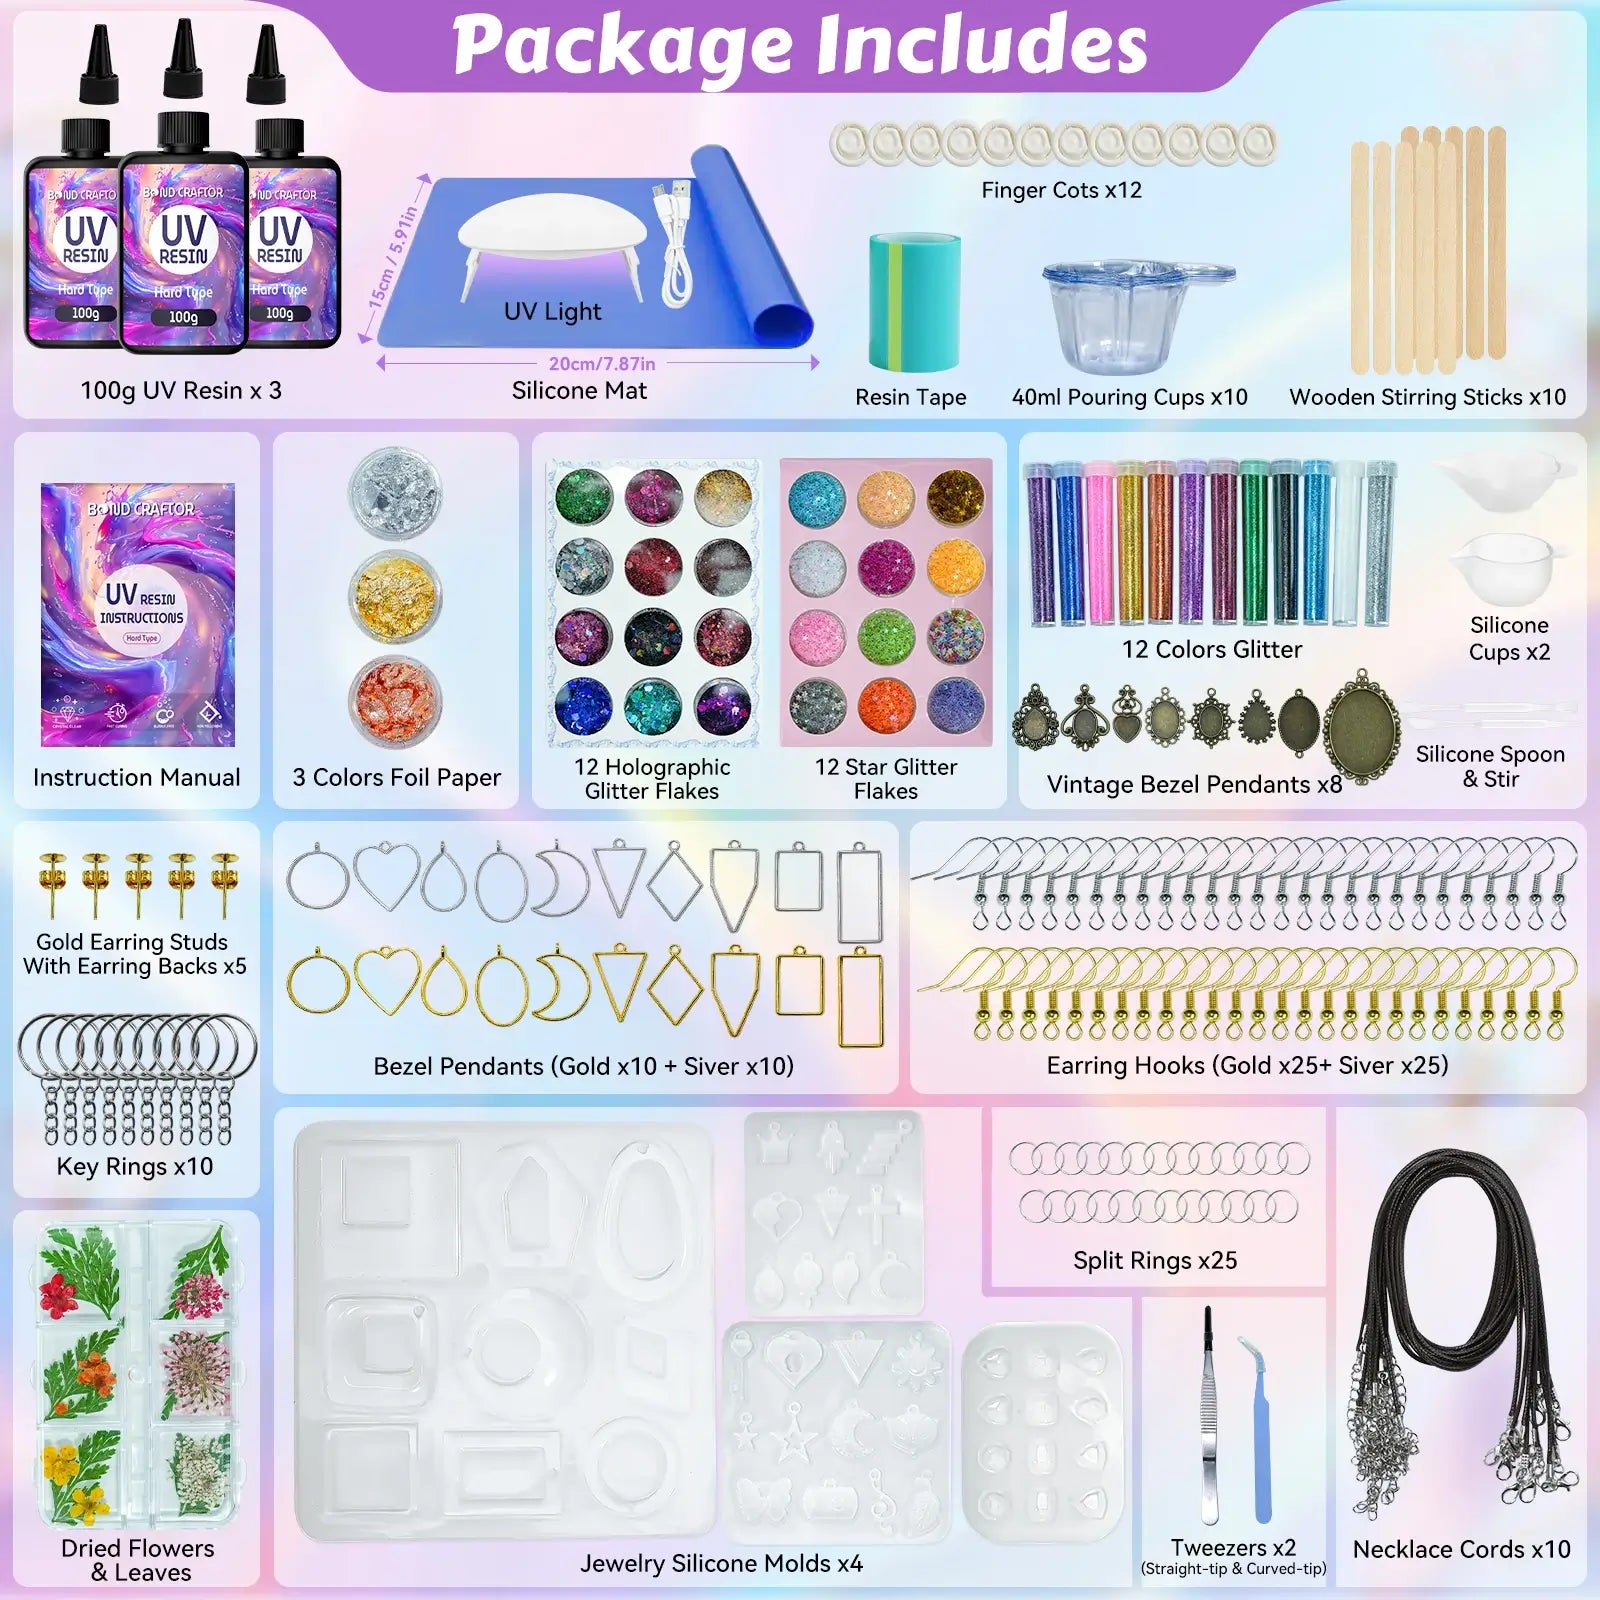
Inside the Bond Craftor UV Resin Kit — Every Item Explained
The Bond Craftor UV Resin Kit is designed to take beginners from zero to finished jewelry without needing to hunt for missing pieces. Let’s break down every item and explain why it’s essential.
🧪100g UV Resin × 3 bottles, 300g total
- Curing parameters: Thin layers under the 36W UV lamp cure in 2–3 minutes; thicker or darker layers take 6–8 minutes.
- Low-odor formula: Comfortable for indoor crafting.
- Hard type: Fully cured pieces are firm for everyday wear.
- 💡 Why three bottles? Beginners use resin quickly; 300g is enough for multiple projects.
💡 The UV Light with Charging Cable
- 36W power: Covers small molds for earrings, pendants, charms, and keychains.
- USB cable: Portable and flexible.
- ⚠️ Beginner mistake to avoid: A regular LED lamp will not cure resin properly.
🟩 Silicone Mat
- Protects your workspace: Resin won’t stick to your table or desk.
- Supports cleaner curing: Place under molds to catch overflow.
- Easy to store: Rolls up for compact storage.
- ⚠️ Tip: Without a silicone mat, your workspace may be damaged.
🥤 40ml Pouring Cups × 10
- Disposable design: Easy cleanup; resin left in cup will harden.
- Good size: Perfect for small batches like earrings or pendants.
- Transparent: Helps monitor color and glitter distribution.
🪵 Wooden Stirring Sticks × 10
- Reduces bubbles: Gentle mixing, beginner-friendly.
- Disposable: Enough for first-week practice.
🖐 Finger Cots × 12
- Precise finger protection: Ideal for small parts.
- Better dexterity than full gloves for tiny components.
- ⚠️ Safety reminder: Avoid direct contact with uncured resin.
🎨 Full Set of Embellishments
- 12 colors of glitter
- 12 holographic glitter flakes
- 12 star glitter flakes
- 3 colors foil paper
- Dried flowers and leaves
- ⚠️ Ensure flowers are fully dehydrated to prevent browning.
💍 Jewelry Hardware Summary
| Accessory | Quantity | Purpose |
|---|---|---|
| Bezel Pendants, Gold + Silver | 10 each | For creating resin pendant designs directly inside the bezel. |
| Earring Hooks, Gold + Silver | 25 each | For turning finished resin pieces into wearable earrings. |
| Gold Earring Studs + Backs | 5 pairs | For making simple stud earrings or small decorative pieces. |
| Key Rings | 10 | For making keychains, bag charms, and small resin accessories. |
| Necklace Cord | 10 | For completing pendant necklaces without buying extra cords. |
| Vintage Bezel Pendants | 8 | For retro-style jewelry and decorative resin designs. |
| Split Rings | 25 | For connecting charms, hooks, key rings, and other components. |
With these quantities, beginners can create 25+ pairs of earrings, 10 necklaces, and 10 keychains without extra purchases.
🧰 Precision Tools
- Tweezers × 2 (straight + curved) — straight for glitter/flowers, curved for bezels
- Silicone Cups × 2 + Silicone Spoon & Stirrer — reusable for small-batch mixing
- Jewelry Silicone Molds × 4 — shallow/transparent; shapes include half-circle, square, flower, and geometric
Every item in the Bond Craftor UV Resin Kit is included with beginners in mind. Open the box and start making beautiful, wearable pieces without needing to buy additional tools, molds, lights, decorations, or hardware.
What Can You Make on Day One — Using Only What’s in the Box
One of the biggest joys of a truly complete UV resin kit is that you can start crafting right out of the box. You don’t need to hunt for molds, findings, or embellishments — everything is included. Here’s a beginner-friendly lineup of projects, from the simplest to slightly more advanced, using only the materials in the Bond Craftor kit.
-
Project 1: Glitter Earrings — 15 minutes
- Materials: UV resin, silicone mold, 12-color glitter, UV lamp, earring hooks, and split rings.
- Overview: Pour resin into the mold, sprinkle in glitter, cure under the UV lamp for 2–3 minutes, demold, and attach the earring hooks.
- Why beginners love it: It is quick, colorful, and easy to finish without extra tools or materials.
-
Project 2: Holographic Bezel Pendant — 20 minutes
- Materials: UV resin, bezel pendants, holographic glitter, and necklace cord.
- Overview: The bezel works like a ready-made frame. Fill it with resin and glitter, cure it under the UV lamp, then thread the necklace cord through the pendant.
- Finished look: A polished, light-catching pendant that feels gift-ready with very little effort.
-
Project 3: Dried Flower Transparent Earrings — 25 minutes
- Materials: UV resin, silicone mold, dried flowers, tweezers, earring hooks, and split rings.
- Overview: Pour and cure a thin base layer, place the dried flowers with tweezers, then add a top layer of resin and cure again.
- Curing tip: Each layer usually takes about 3 minutes, so total curing time is around 6–8 minutes.
- Finished look: Delicate, transparent earrings with a soft nature-inspired style.
-
Project 4: Vintage Foil Pendant Necklace — 30 minutes
- Materials: UV resin, vintage bezel pendant, foil paper, and necklace cord.
- Overview: Tear the foil into small pieces, place them inside the bezel, pour resin to cover, cure under the UV lamp, and finish with the necklace cord.
- Finished look: A metallic, slightly vintage-style pendant that looks sophisticated but requires minimal skill.
-
Project 5: Star Keychain — 15 minutes
- Materials: UV resin, silicone mold, star glitter, key ring, and split ring.
- Overview: Pour resin into a star-shaped mold, add star glitter, cure under the UV lamp, demold, and attach the key ring.
- Why it’s great for day one: It is simple, fast, and immediately rewarding for first-time resin makers.

The One Thing to Know Before You Start
Most beginners who struggle with UV resin don’t actually have a resin problem — they have a light problem. Here’s the reality: you pour the resin, cure it under the UV lamp, pop it out of the mold — and the bottom feels slightly tacky or the top surface comes out a little rough. You might think something went wrong.
It didn’t. The rough top is normal: the side exposed to air never gets the same smooth finish as the side touching silicone. A quick pass with a fine-grit nail file or polishing block (30 seconds) smooths it completely, and your kit’s tweezers hold the piece steady while you work.
A slightly tacky bottom usually means the UV lamp wasn’t close enough, or curing time was too short. Bond Craftor UV Resin cures thin layers in 2–3 minutes under a 36W lamp; deeper or darker pours need 6–8 minutes.
One final tip: avoid working in direct sunlight — your resin can start curing before you’re ready. That’s it: no mixing ratios, no temperature control, just pour, cure, and wear.